
Markdown is great at a lot of things. Headings, bold text, links — all effortless. Tables? Not so much.
If you’ve ever tried to hand-code a Markdown table, you know the pain. One misplaced pipe | and the whole thing falls apart. One missing hyphen and your columns look like a ransom note.
But tables are essential. They are the best way to organize data, compare options, or lay out a spec sheet clearly. The real question isn’t whether you should use them — it’s how you can build them without losing your mind.
In this guide, we’ll walk through every major method for creating Markdown tables, from the manual syntax to fully automated tools. Pick the method that fits your workflow best.
The Anatomy of a Markdown Table
Every Markdown table is built from two basic elements:
- Pipes (
|) to separate your columns. - Hyphens (
-) to create the header divider row.
To make a table render properly, you need a minimum of three lines: a header row, a divider row, and at least one data row. Everything else is just repetition.
Here is the raw code for a basic table:
Markdown
| Product Name | Category | Price |
| --- | --- | --- |
| Wireless Mouse | Electronics | $25.00 |
| Leather Journal | Office Supplies | $15.50 |
When processed by a Markdown viewer, that raw text turns into a clean, structured table:
| Product Name | Category | Price |
| Wireless Mouse | Electronics | $25.00 |
| Leather Journal | Office Supplies | $15.50 |
Method 1: The Manual Syntax (With Custom Alignment)
By default, Markdown table text is left-aligned. However, you can control column alignment precisely by adding colons (:) to the hyphen lines in your divider row.
- Left Alignment (Default): Place a colon on the left side (
:---). - Right Alignment: Place a colon on the right side (
---:). Perfect for numbers and prices. - Center Alignment: Place colons on both sides (
:---:). Great for status tags.
Here is how the alignment syntax looks in raw text:
Markdown
| Item Description | Status | Unit Cost |
| :--- | :---: | ---: |
| Premium Web Hosting | Active | $12.00 |
| Domain Registration | Pending | $0.00 |
| SSL Certificate | Renewed | $49.99 |
When rendered, it provides a clean visual layout with properly aligned columns:
| Item Description | Status | Unit Cost |
| Premium Web Hosting | Active | $12.00 |
| Domain Registration | Pending | $0.00 |
| SSL Certificate | Renewed | $49.99 |
Manual syntax is fine for small, simple tables. But once you deal with large datasets or shifting data, counting pipes gets slow and error-prone.
Method 2: Using an Online Generator (The Fastest & Easiest Way)
If counting pipes and hyphens by hand isn’t your idea of a good time, you are not alone. This is exactly why using an online Markdown table generator is the smartest alternative.
Instead of writing syntax manually, you build your table visually inside an interactive grid—just like a spreadsheet. The tool handles the code formatting automatically in the background. No syntax errors, no counting hyphens, no guesswork.
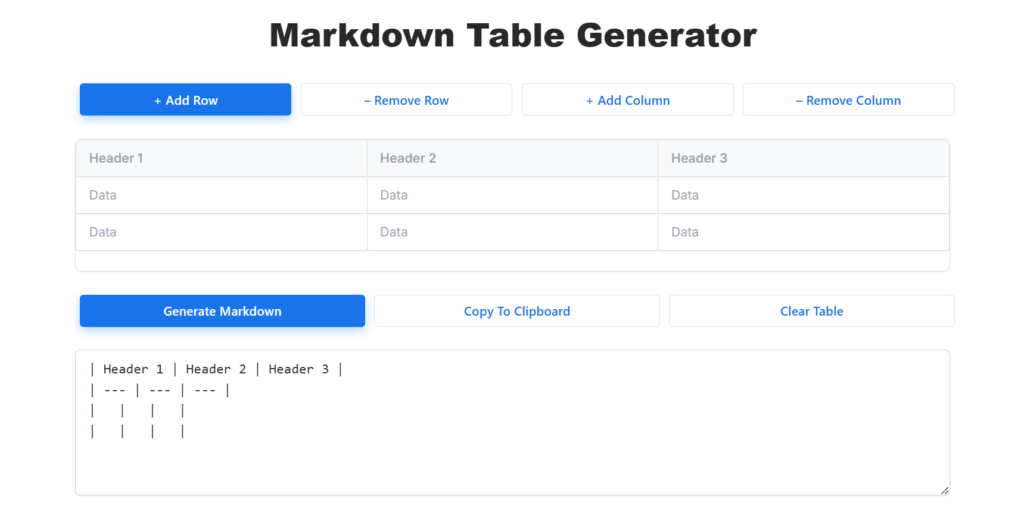
How to Use the Markdown Table Generator
Using this tool is straightforward and requires zero technical knowledge. Follow these simple steps:
- Set Your Table Structure: Use the + Add Row, – Remove Row, + Add Column, and – Remove Column buttons to create the exact grid size you need.
- Input Your Data: Click on any cell in the visual table and start typing your headings and row data.
- Generate: As you type, the tool automatically generates the corresponding Markdown code in the output box below. You can also click Generate Markdown to refresh it manually.
- Copy & Paste: Click the Copy to Clipboard button to instantly copy the code, then paste it directly into your Markdown editor, GitHub repository, or CMS.
This method completely eliminates syntax memorization. It is a massive timesaver when you are building larger tables or adjusting complex column layouts.
Method 3: Converting from Excel or Google Sheets
A lot of table data doesn’t start in Markdown—it starts in a spreadsheet. If you already have a budget, comparison chart, or client report in Excel, you don’t have to retype a single cell.
Option 1: The Formula Approach (Clunky)
Some creators write custom concatenation formulas inside a spare spreadsheet column to stitch cells together with pipes (|). It works, but it breaks the moment your column count changes, forcing you to rebuild the formula from scratch.
Option 2: The Copy-and-Paste Approach (Easiest Way)
The faster, automated workflow looks like this:
- Highlight and copy your cells directly inside Excel or Google Sheets.
- Paste them directly into a web-based paste-and-convert utility.
- The utility processes the tab-separated values (TSV) format from your clipboard and instantly outputs flawless Markdown table syntax.
This method is a lifesaver if you regularly pull data from external reports into documentation, project wikis, or GitHub README files.
Method 4: Using Text Editor and IDE Extensions
If you are a web developer, software engineer, or technical documentation writer, you likely spend the majority of your workday working directly inside a specialized code editor or an Integrated Development Environment (IDE). Leaving your code editor workspace just to open up a web browser can disrupt your creative flow.
To solve this, most modern code editors offer an array of community-made extensions designed to automate table creation right inside your current project window.
Visual Studio Code (VS Code)
VS Code features an incredibly rich marketplace of extensions. If you look up popular extensions like Markdown All in One or Markdown Table Prettifier, you can add some serious layout superpowers to your setup.
These tools offer highly useful features:
- Auto-Formatting Layouts: You can type out a highly messy, completely unaligned table by hand without worrying about spaces. When you save your file or type a hotkey shortcut, the extension instantly adds spaces to make the raw plain-text code layout look neat and readable.
- Automatic Expansion: As you type new data inside a row, the extension automatically shifts the trailing pipes down the line, maintaining a perfect visual balance inside your editor screen.
Obsidian and Advanced Markdown Editors
Modern markdown-first knowledge bases like Obsidian have completely reimagined how text applications interact with tabular layouts. Instead of making you manage raw lines manually, Obsidian features a built-in rich text editor mode.
When you create a table inside Obsidian, it displays an intuitive graphical grid. You can right-click any edge to inject a row, rearrange columns using drag-and-drop actions, and type directly into fields. However, when you open that exact same file inside a basic text utility like Notepad, you will find that Obsidian has cleanly written perfect plain-text Markdown code behind the scenes.
Markdown Table Best Practices
To save yourself a layout headache down the line, keep these technical habits in mind:
- Keep your raw code readable: Add single spaces around your source pipes (
| Data |instead of|Data|). It doesn’t change how the table renders on screen, but it makes the raw file infinitely easier to edit later. - Handle line breaks carefully: Standard Markdown tables do not support hitting the Enter key inside a cell. If you absolutely need a line break within a single cell, insert an HTML
<br>tag exactly where you want the line to split. - Test before you publish: Table rendering is not 100% universal across platforms. GitHub, GitLab, and various web CMS platforms handle wide layouts, custom spacing, or alignment slightly differently. Always preview your table on your target platform before deploying it.
- Don’t overload a single table: If you are cramming 8 or more columns onto a page, your table will likely break or cut off on mobile viewports. If data gets too dense, split it into two smaller, highly focused tables instead.
Summary: Which Method Should You Choose?
| Creation Method | Ideal Use Case | Pros | Cons |
| Manual Syntax | Making quick, single-word edits directly inside a file. | Requires no extra tools; works instantly anywhere. | High chance of typos; incredibly slow for big data sets. |
| Online Generator | Writing blog posts, tutorials, and standard docs. | Full visual preview; zero chance of syntax bugs. | Requires switching over to a web browser tab. |
| Spreadsheet Import | Moving analytics reports or product inventories. | Migrates hundreds of cells in a couple of clicks. | May require cleaning up weird spacing beforehand. |
| Editor Extensions | Heavy programming, technical docs, or book authoring. | Keeps your hands on your IDE keyboard shortcuts. | Requires installing and setting up custom plugins. |