If you’ve ever resized a photo and watched it turn into a blurry, pixelated mess, you’re not alone. It happens to almost everyone at some point — you shrink an image for a website, or blow one up for a banner, and suddenly it looks like it was taken with a potato instead of a camera.
The good news? Image quality loss isn’t random. It follows a few predictable rules. Once you understand them, you can resize almost any image and keep it looking sharp.
This guide walks through exactly why images lose quality, what actually causes it, and how to avoid it — whether you’re using design software or a simple online tool.
Understanding the Basics: Resolution, Dimensions, and DPI
Before touching any image, it helps to know what you’re actually changing.
Dimensions are just the width and height of an image, measured in pixels. A photo that’s 3000 x 2000 pixels has 6 million individual pixels packed into it.
Resolution describes how densely those pixels are packed — usually written as DPI (dots per inch) or PPI (pixels per inch). This matters a lot for print, but barely at all for screens. A web browser doesn’t care if your image is 72 DPI or 300 DPI. It only cares about the pixel dimensions.
Aspect ratio is the relationship between width and height. A 1600 x 900 image has a 16:9 ratio. If you resize it to 1600 x 1200, you’ve just changed the ratio to 4:3 — and every face in that photo now looks squished.
One more distinction worth knowing: raster images (JPEG, PNG, WebP) are made of fixed pixels, so they lose detail when scaled up. Vector images (SVG, AI, EPS) are built from math and shapes, so they scale to any size with zero quality loss. This guide focuses on raster images, since that’s what causes almost all the resizing headaches people run into.
Why Images Lose Quality When Resized
Here’s the part most people skip, and it’s the part that actually explains everything.
Downscaling (making an image smaller) throws away pixel data. Your computer has to decide which pixels to keep and which to discard, and it does this using a mathematical process called interpolation.
Upscaling (making an image bigger) has the opposite problem. There’s no extra pixel data to add, so the software has to invent new pixels by guessing what should go between the existing ones. This guessing is where blur and softness come from.
Different interpolation methods handle this guesswork differently:
- Nearest neighbor — fastest, but blocky and rough. Rarely a good choice for photos.
- Bilinear — smoother, averages nearby pixels. Decent for quick resizes.
- Bicubic — considers more surrounding pixels, produces noticeably sharper results. This is the standard for most photo resizing.
- Lanczos — one of the most detail-preserving methods available, especially good for downscaling.
It’s also worth separating two problems people often lump together: resizing artifacts (softness, blur, jagged edges from scaling) and compression artifacts (blockiness, color banding, weird halos around edges from file compression). They look similar but come from completely different causes — and fixing one won’t fix the other.
Choosing the Right File Format Before You Resize
Format choice affects quality just as much as the resize itself.
JPEG is the standard for photographs. It uses lossy compression, meaning some data is permanently discarded to reduce file size. Good for photos, not great for text or sharp-edged graphics.
PNG uses lossless compression, so no quality is lost — but files are bigger. It also supports transparency, which makes it the go-to for logos, icons, and graphics with clean edges.
WebP and the newer AVIF format offer a better balance: smaller file sizes than JPEG or PNG at similar quality levels. Most modern browsers support both, making them solid choices for web use today.
A quick rule of thumb: photos go in JPEG or WebP, graphics with transparency go in PNG, and if file size is your top priority, WebP or AVIF usually wins.
Best Practices for Downscaling (Making Images Smaller)
Downscaling is the more forgiving of the two operations, but a few habits make a real difference.
Always start from the original file. Every time you resize a JPEG and save it, you compress it again. Resize a copy of a copy of a copy, and you’re stacking quality loss on top of quality loss. Keep one untouched master file and resize from that every time.
One resize is usually better than several small ones. Going from 4000px down to 800px in a single step generally holds up better than doing it in three or four smaller jumps.
Apply a light sharpening pass afterward. Downscaling softens fine detail. A small amount of sharpening — even a basic “unsharp mask” — brings back some of that crispness without introducing obvious artifacts.
Match dimensions to actual use case. There’s no reason to upload a 4000px image if it’s only ever displayed at 800px. Some rough guidelines:
- Blog header images: 1200–1600px wide
- Thumbnails: 300–600px wide
- Social media posts: varies by platform, but generally 1080px wide covers most cases
Best Practices for Upscaling (Making Images Bigger)
Upscaling has hard limits that no software can fully get around. If a photo starts at 500 x 500 pixels, there’s no way to turn it into a crisp 4000 x 4000 image — the detail simply doesn’t exist in the original file.
That said, a few things help:
Start with the largest source file you have. Even an extra 20% in original resolution makes a noticeable difference after upscaling.
AI-based upscaling tools have gotten genuinely good at reconstructing plausible detail — edges, textures, even some facial features. They can’t recover information that was never captured, but they do a much better job of guessing convincingly than older interpolation methods.
Avoid extreme jumps. Doubling an image’s size is far more forgiving than trying to make it 5x or 10x larger. Past a certain point, no method — AI or otherwise — will produce a result that looks natural.
Compression: The Other Half of the Quality Equation
Resizing controls dimensions. Compression controls file size. They’re related, but they’re not the same thing, and mixing them up is one of the most common reasons people get confused about “why does my resized image still look bad.”
Lossy compression (used by JPEG) removes data permanently to shrink file size. Push it too far, and you’ll see blockiness, color banding, or halo effects around sharp edges.
Lossless compression (used by PNG) shrinks file size without touching image data, but the size savings are much smaller.
There’s a point of diminishing returns with compression — past roughly 80–85% quality on most JPEG exports, you’re barely saving file size but visibly losing detail. If you want to dig deeper into this specific topic, this guide on how to compress images without losing quality breaks down exactly where that sweet spot sits and how to find it for different image types.
Step-by-Step: Resizing an Image Without Losing Quality
Here’s how it all comes together in practice:
- Start with your original, highest-resolution file.
- Decide your target dimensions based on where the image will actually be used.
- Keep the aspect ratio locked so nothing stretches or distorts.
- Choose an output format that matches the content — JPEG or WebP for photos, PNG for graphics with transparency.
- Resize using a method that preserves detail (bicubic or Lanczos, if you have the option).
- Apply light sharpening if the image looks soft afterward.
- Compress moderately — enough to reduce file size, not so much that artifacts appear.
- Preview before saving. Zoom in on edges and fine detail to check for blur or blockiness.
You don’t need design software to do this. A browser-based tool like the 99Tools Image Resizer handles the aspect ratio math automatically, which removes one of the most common sources of distorted images — manually typing in mismatched width and height values.
How to Use an Online Image Resizer
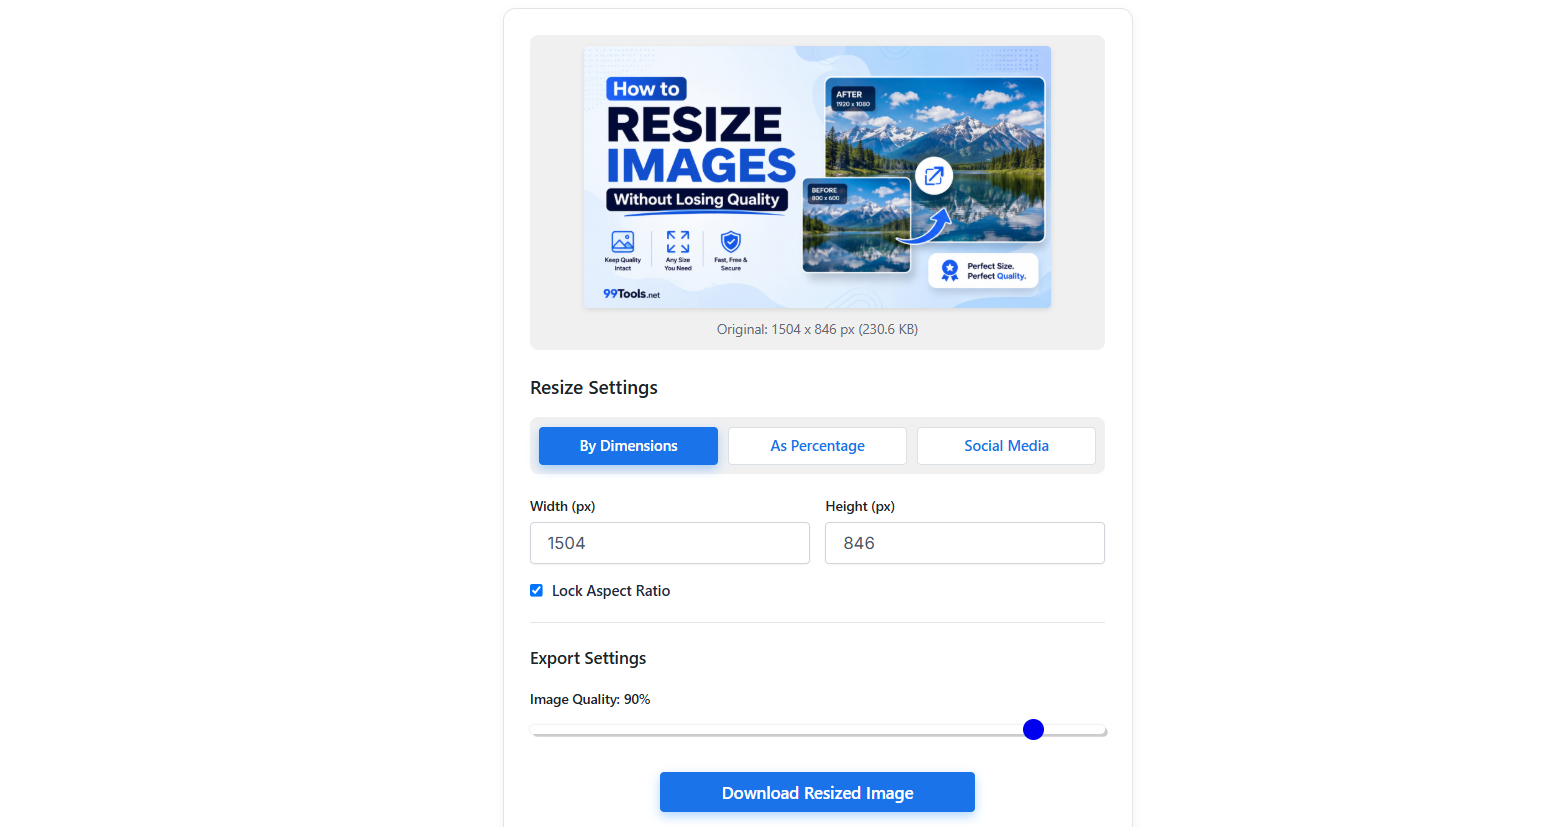
If you want to try this workflow without installing anything, here’s the general process:
- Upload your image. Select the file from your device to load it into the tool.
- Check the current dimensions. The tool reads the image and shows you its existing width and height, so you know your starting point.
- Enter your new size. Type in the width or height you need, in pixels.
- Keep “Maintain Aspect Ratio” checked. This lets the tool calculate the matching dimension automatically, so your image doesn’t come out stretched or squashed.
- Download the result. Save the resized image straight to your device.
That’s it — no software, no manual math, no guessing at ratios.
Batch Resizing Tips (For Multiple Images)
Resizing one image at a time works fine until you have fifty product photos that all need the same treatment.
For batches, consistency matters more than perfection on any single image:
- Use the same target dimensions across the whole set, unless individual images genuinely need different sizes.
- Export everything in the same format, so your site or gallery doesn’t end up with a mismatched mix of JPEG, PNG, and WebP files.
- If you’re doing this regularly, look for a tool or workflow that supports bulk uploads rather than resizing files one by one — it saves a significant amount of time over a large library.
Common Mistakes That Cause Quality Loss
A few habits quietly wreck image quality more often than anything else:
- Resizing the same file over and over. Each save compounds the loss, especially with JPEG.
- Using CSS or HTML to “resize” images. Setting a smaller width/height in code doesn’t actually resize the file — it just tells the browser to display it smaller, while the full-size file still loads in the background. That’s wasted bandwidth, not a real fix.
- Ignoring color profile shifts. Occasionally, resizing in certain software strips or alters color profiles, making colors look slightly off. Worth double-checking on important images.
- Compressing to hit an arbitrary file size. Chasing a specific number (like “under 100KB”) without checking the visual result often leads to over-compression and visible artifacts.
Quick Reference Checklist
- Always resize from the original file, never a resized copy
- Lock the aspect ratio before changing dimensions
- Match format to content type (JPEG/WebP for photos, PNG for graphics)
- Use bicubic or Lanczos interpolation when the option is available
- Sharpen lightly after downscaling
- Compress moderately — check the image, not just the file size
- Avoid extreme upscaling jumps
- Preview and zoom in before finalizing
FAQs
Does resizing an image always reduce its quality?
Not always. Downscaling a large image usually preserves quality well since there’s plenty of detail to work with. Upscaling is where quality loss becomes unavoidable, since new pixel data has to be estimated rather than captured.
What’s the difference between resizing and compressing an image?
Resizing changes the pixel dimensions (width and height). Compression changes how much data is used to store the image, affecting file size. You can resize without compressing, and compress without resizing — they’re separate steps.
What’s the best image size for websites without slowing down load time?
It depends on placement, but most web images work well between 1200–1600px wide for full-size content and 300–600px for thumbnails. Anything larger than the space it’s displayed in is wasted file size.
Can I resize a JPEG multiple times without damaging quality?
Each time you resize and re-save a JPEG, it compresses again, which compounds quality loss over time. It’s better to keep an untouched original and resize from that file each time rather than resizing a version that’s already been resized.
Is PNG or JPEG better when resizing photos vs. graphics?
JPEG is generally better for photographs due to smaller file sizes at acceptable quality. PNG is better for graphics, logos, or anything needing transparency, since it doesn’t lose data during compression.
How do I resize an image without distorting or stretching it?
Keep the aspect ratio locked. If you manually enter both width and height without maintaining the original ratio, the image will stretch or squash. Most resizing tools have a “maintain aspect ratio” option that handles this automatically.
What resolution (DPI) should I use for print vs. web?
For web, DPI is mostly irrelevant — browsers only read pixel dimensions. For print, 300 DPI is the standard for sharp results, though 150 DPI can be acceptable for larger prints viewed from a distance.
Can AI upscaling actually restore detail in a low-res image?
AI upscaling tools are good at generating plausible detail that looks convincing, especially for edges and textures. They can’t recover information that was never captured in the original photo, but they generally outperform traditional interpolation methods for enlarging images.
What’s the ideal image size for Instagram, Facebook, or other social platforms?
This varies by platform and post type, and platforms update their specs periodically. As a general starting point, 1080px wide covers most standard feed posts, but it’s worth checking current platform guidelines before a major campaign.
Do I need design software to resize images, or can I do it online?
For most everyday resizing — social posts, website images, thumbnails — an online resizer is enough and is often faster than opening design software. Design software becomes more useful when you need advanced editing alongside the resize, like retouching or layering.
Final Thoughts
Image quality loss isn’t bad luck — it’s the predictable result of a few specific factors: resolution limits, interpolation method, file format, and compression level. Get those four things right, and resizing stops being a gamble.
Start with your best original file, resize with the right method, pick a format that matches your content, and compress with a light hand. Small habits, but they add up to images that actually look the way you intended.